Parts:
I happened to have an old paraboloid-shape battery-powered bike light lying around. I modified it by replacing the single mini-lightbulb with five "superbright" LEDs. Now I have a bike light that gives more light and lasts a whole winter with one charge of the batteries.
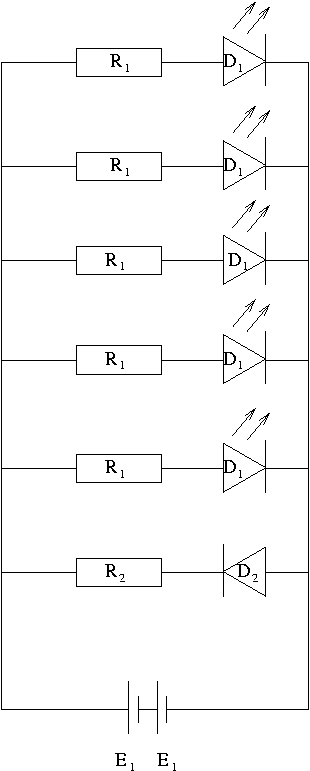
Here's the schematics of the system. Unfortunately I don't have the exact specs of some of the parts any more. Note: If you are going to build your own light, check your parts' specifications and know what you are doing. The resistance and voltage values work for me, with the parts that I used. Your parts are probably different. You need to calculate suitable values for your own resistors. Don't come blame me for anything. I'm saying what I did, not saying you should try to do the same.
Parts: |
|
So that's how the bits and pieces are supposed to relate to each other. Another problem is to build this system in the chassis of the old light. For instance, what do you attach the LEDS to? I solved this in one way, which is not very perfect.
The reflective concave backpane of the light has a hole in its center for the base of the lightbulb. I simply left the lightbulb-base out and so had a hole approximately 15 mm wide. I arranged the LEDs in a semicircle pattern, bending each LED to a J shape. Thus the legs of the LEDs stick through the hole and the LEDs are aimed at the reflective backpane. To fix the LEDs in place, I used stuff called "Sika-Flex". It's a gluey, sticky mass that is mainly intended for sealing seams in houses. But as a gluey, sticky mass it was applicable to this use as well. I put the LED assembly in place from the front, supported them in the right position relative to the backpane, filled the hole with a blob of Sika-Flex and waited for it to dry. Voila! Now I only needed to solder the wire from the power switch to the R1's and one end of a wire to the other legs of the LEDs. Then, add the batteries between the switch and the wire from the LEDs and there is light.
Another attaching problem was the power source. The battery compartment of the chassis is designed for two "D" size batteries. It would hold them between spring contacts, but my two-pack of 3xAAA batteries would need something else to keep it in place. The solution? A piece of thin plastic-coated metal wire, with which the taped-together batteries are tied to the battery platform. Not very professional but it does its job.
For charging the batteries -- yes, they do need to be recharged at times :) -- I bought a 9V AC adapter that has a 4-way universal DC jack, and a connector that fits to one of the jacks. I took a piece of 3-wire cable and attached one end to the connector. The other end is easily wrapped to the contacts of the batteries. (The third wire is useless. I just happened to have a piece of 3-wire cable at hand and no 2-wire.)
I built the light in the autumn of 2002 and used it about from October to April without ever having to recharge. I bike for about two hours a week so I got around 50 hours of light from one charge. Even after a summer unused, the light still came on.
The price? About 35 euros total. That includes the electronic components and the charger. Construction took a couple of hours -- I'm not very experienced with electronics nor particularly dexterous with my hands.
Co-credit for the electronics design of the light is due to my friend Ari Okkonen, a man of many talents. Full responsibility for any mistakes or errors in this presentation is completely mine, though.